There are two ways you can translate your WordPress theme. You can choose to update it with Loco Translate, which is what will be outlined in this article, or alternatively, you can update it via Poedit. Before translating your WordPress theme, you need to install Loco Translate plugin from WordPress admin panel. So let’s start!
How to Install Loco Translate #
Step 1 – Login to your WordPress admin panel.
Step 2 – Navigate to the Plugins > Add New from the WordPress admin panel.
Step 3 – Search for ‘Loco Translate’ from the search form.
Step 4 – Click the ‘Install Now’ button on Loco Translate plugin.
Step 5 – Wait for the plugin to installed.
Step 6 – Click the ‘Activate’ button.
Let’s Start Translating #
Step 1 – Navigate to Loco Translate > Themes page from the WordPress admin panel.
You can translate all themes, plugins and WordPress core via Loco Translate.
- Loco Translate > Themes: Theme translation
- Loco Translate > Plugins: Plugin translation
- Loco Translate > WordPress: WordPress core translation
Step 2 – From this page, you will see all installed themes. Click on the theme you want to translate.

- New Language: You can start translating directly from the template prepared by your theme or plugin.
- Upload PO: If you already have a translation for this theme or plugin, you can continue to translate with it.
- Create Template: If the theme or plugin does not have a translation template, you can create an automatic template here and start translating.
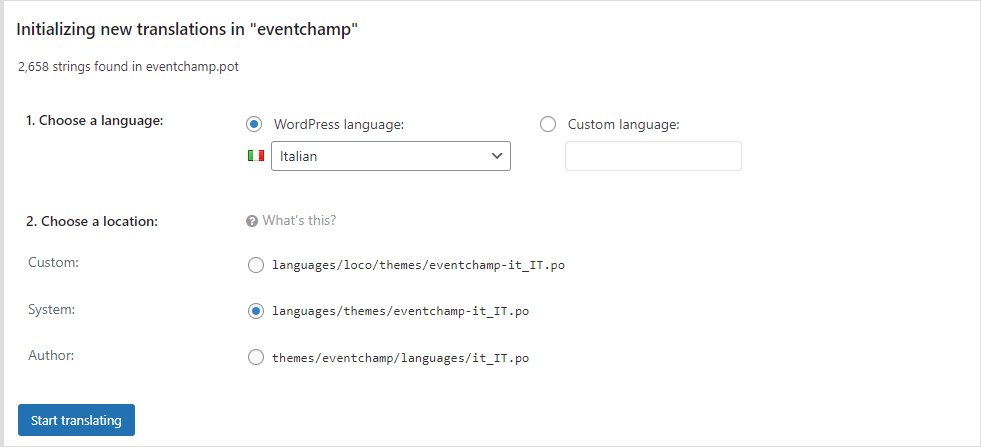
Step 4 – Select the language you want to translate from ‘Choose a Language’ option. Also, you need to choose a location from the ‘Choose a Location’ option to save the translation file. After translation you will have a .POT file. This file will be automatically saved to that path. Click on the ‘Start Translating’ button after making your choices.
We recommend that you select “System” for the location.

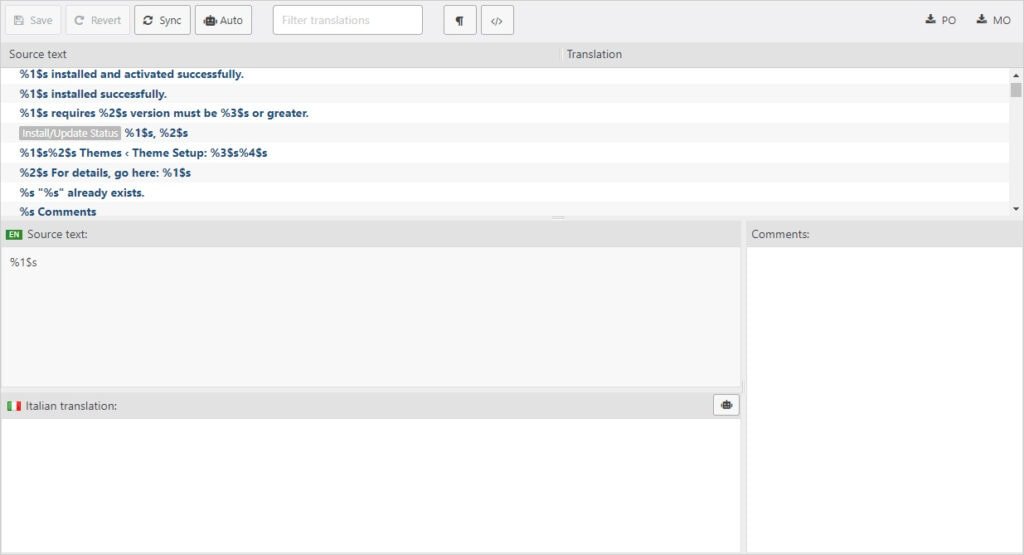
Step 5 – A list of all translatable words will open. You can translate all strings with this interface.

Step 6 – After completing your translation, click on the ‘Save’ button.
Loco Translate FAQ #
Interface Buttons #
- Sync Button: Adds newly added strings to your translation after updating the theme.
- Revert: Resets the translation file. You will lose all your translations on that page.
- Auto: It allows you to receive automatic translations. It needs API connection.
- Toggle Invisibles: Allows you to toggle the paragraph feature on or off.
- Toggle Code View: Allows you to toggle the code view on or off.
- PO: Allows you to download the translation as a .PO file.
- MO: Allows you to download the translation as a .MO file.
How Do I Automatically Translate? #
Step 1 – Navigate the Loco Translate > Settings page from WordPress admin panel.
Step 2 – Open the API Keys panel from the top of the page.
Step 3 – You will see a list of the API key services (Google Translate, Microsft Translator, DeepL Translator, Yandex Translate etc). After making your API settings, you can request automatic translation from the translation interface.
Click for the automatic translation details
How to Find Loco Translate Settings #
Navigate the Loco Translate > Settings page from WordPress admin panel. You can customize your all Loco Translate settings from this page.
All Loco Translate Documentation #
The plugin author has prepared very detailed documentation for its users. Click here for more documentation.