- What is Multilingual Website and Polylang?
- How to Install Polylang?
- Translating Website Content
- Language Switcher
- Polylang FAQ
- How to Add New Languages to Polylang?
- How to Remove a Language from Polylang?
- How to Use Polylang in Post Types and Taxonomies?
- How to Migrate WPML to Polylang?
- How to Enable the Browser's Preferred Language Detection
- How to Change URL Structure for Polylang?
- How to Translate URLS slugs
- How to Find Polylang Documentation?
What is Multilingual Website and Polylang? #
You can use WordPress in any language that you want. It is super easy to create a website in any single language. However, by default WordPress can support only one language at a time. Companies, government sites, sports clubs, international service organizations and other many websites often need to offer their website in multiple languages.
There are two solutions for this need. One way to offer multiple language options is to install WordPress installation in subdomains or subdolder for each language. This is a lot of hassle, as you will have to manage updates, contents, themes, plugins, and backup all those installations. Therefore, we do not recommend this way.
The other way is a WordPress installation with a multilingual plugin. Polylang or WPML plugins will encounter your need. In this article, we will tell you Polylang installation, usage and other details. Polylang is one of the most popular translation plugins on the market. With Polylang you can translate pages, posts, custom types, taxonomy, menus and even the theme’s texts.
How to Install Polylang? #
Step 1 – Login to your WordPress admin panel.
Step 2 – Navigate to the Plugins > Add New.
Step 3 – Search for ‘Polylang’ from the search form.
Step 4 – Click the ‘Install Now’ button on Polylang plugin.
Step 5 – Wait for the plugin to installed.
Step 6 – Click the ‘Activate’ button.
Step 7 – You will be redirected to the installation wizard. If you don’t redirect, Click on the ‘Run the Setup Wizard’ button from the notification in the header.
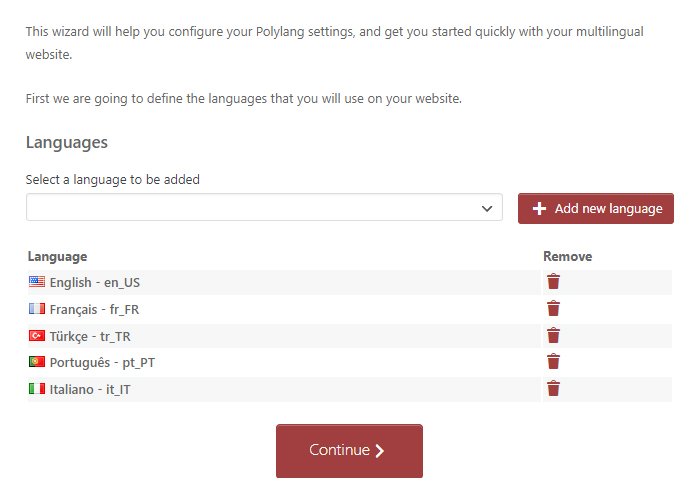
Step 8 – Select the languages you want to add from the ‘Languages’ field in first step (Languages). After selecting each language, click on the ‘Add new language’ button. After the selection is complete, click on the ‘Continue’ button.
Step 9 – In the second step (Media), choose your settings for media translation. Allow or not Polylang to translate media. Click on the ‘Continue’ button.
Step 10 – In the third step (Content), choose the default language to be assigned. Click on the ‘Continue’ button.
The selected language below will be applied to all your content without an assigned language.
Step 11 – In this step (Homepage), generally you will see your Polylang preferences and site settings. Click on the ‘Continue’ button.
Step 12 – In this last step (Ready!), one final step with some information. You can click on the ‘Return to the Dashboard’ button or read the documentation. You’re ready for translation!
Translating Website Content #
Translating Pages, Posts, and Custom Post Types #
Step 1 – Navigate to the post type you want to edit. (Pages, posts etc.)
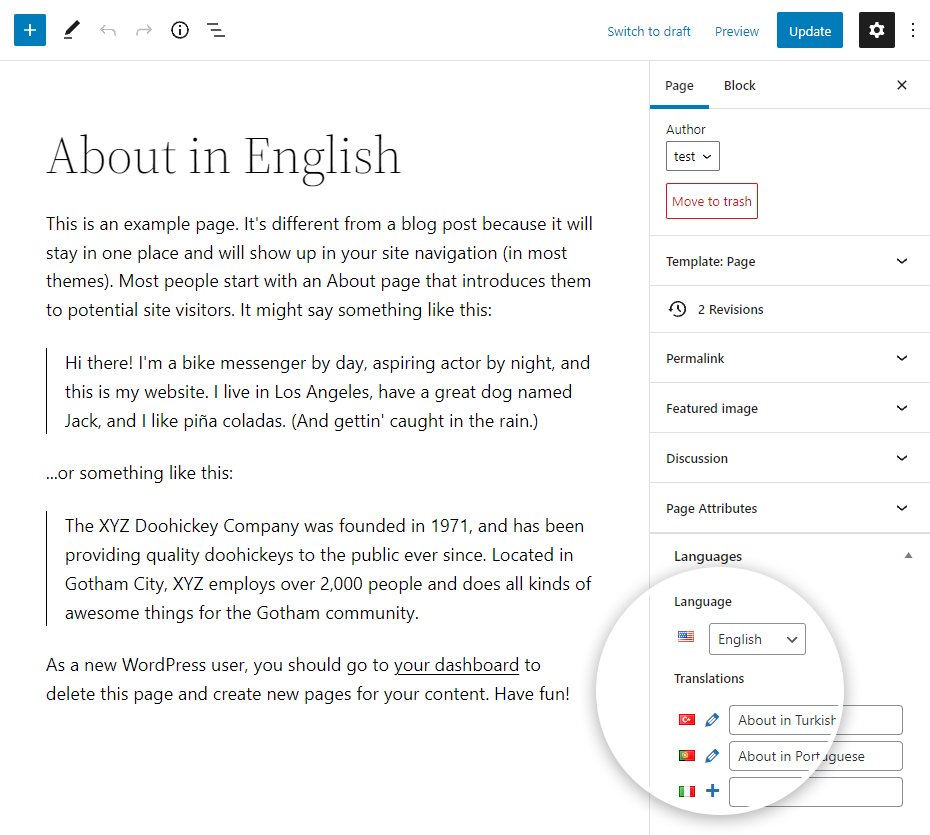
Step 2 – Click the plus/edit icon for the language you want to translate the post into.
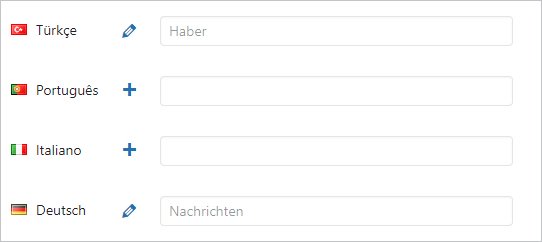
Clicking on the plus icon allows you to add a new translation. The edit icon means that a translation exists. Clicking on it allows you to edit the translation.
If the languages are not visible, click the ‘Screen Options’ button at the top right, choose the language you want to use.

Step 3 – WordPress page editor will open. After creating/editing your content, you can save and close it.
Translating Categories, Tags and Taxonomies #
Step 1 – Navigate to the taxonomy you want to edit. (Categories, tags, etc.)
Step 2 – Click on the ‘Edit’ button in the taxonomy you want to edit.
Step 3 – You will see ‘Translations’ field. Click the plus icon of the language you want to add a translation for.
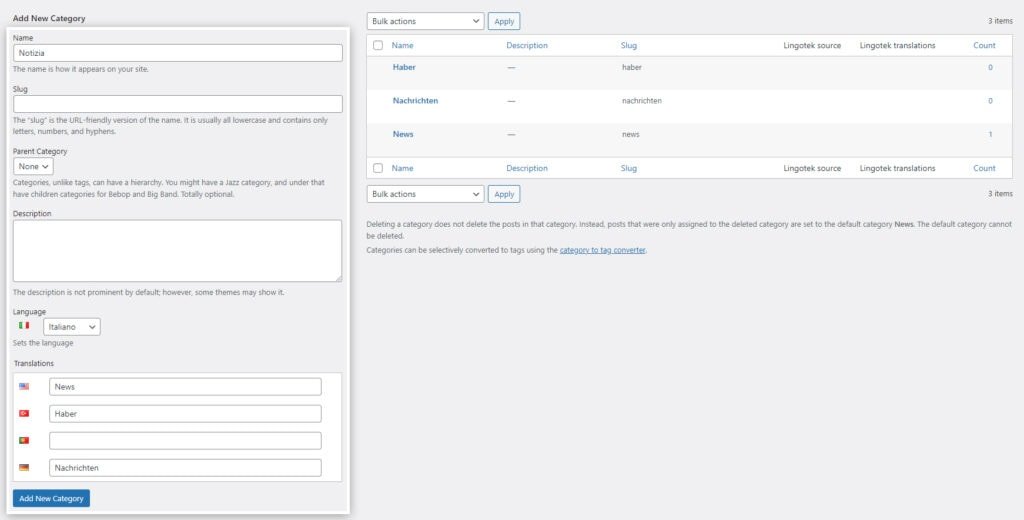
Step 4 – The new taxonomy creation page will open. Fill in the fields. So there will be a term for each language.
Step 5 – After filling, click on the ‘Add New’ button.
Translating Strings #
You will usually translate website content from the Translation Management page. However, sometimes you need to translate texts that do not belong to any specific page. For example, you may need to translate widget titles, customizer/theme option texts, theme texts, or the site’s tagline.
Step 1 – Navigate to the Languages > Strings Translations.
Step 2 – You will see a list of all strings on this page.
Step 3 – Search for your strings using the filters at the top of the page or locate the strings you want to translate.
Step 4 – Check the strings you want to translate. The string column contains the source string. You can translate it in all your languages thanks to the input fields in the translations column.
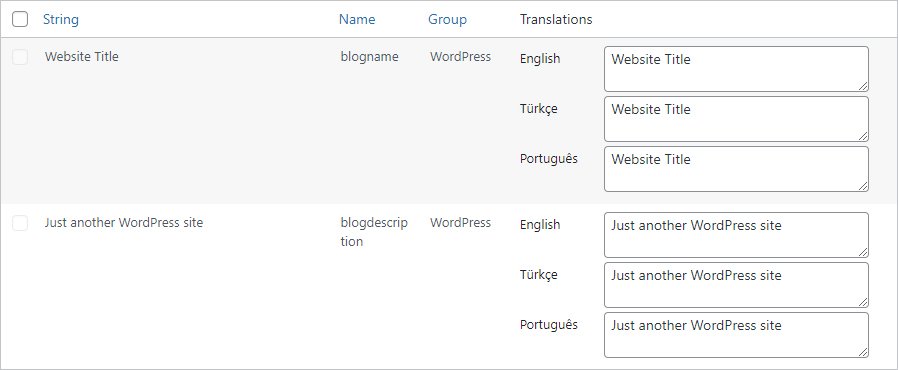
Step 5 – After the process is finished, click on the ‘Save Changes’ button.
Translating Media #
Step 1 – Navigate to the Languages > Media. If the Media module is inactive, active it.
Step 2 – Then, navigate to the Media > Library.
Step 3 – The language columns appear in the media list table, and you need to assign a language to all your media either by editing it or by setting the default language for the existing content. Click on the ‘Edit’ button.
If the languages are not visible, click the ‘Screen Options’ button at the top right, choose the language you want to use.
Step 4 – Let’s say that you want to create the French translation, click on the corresponding ‘Plus’ in languages metabox. You will notice that Polylang automatically copies the content from the source media. Thus you need to translate only the fields that you want and keep the others common to all translations.
You can enter a caption, alternative text and description for each language.
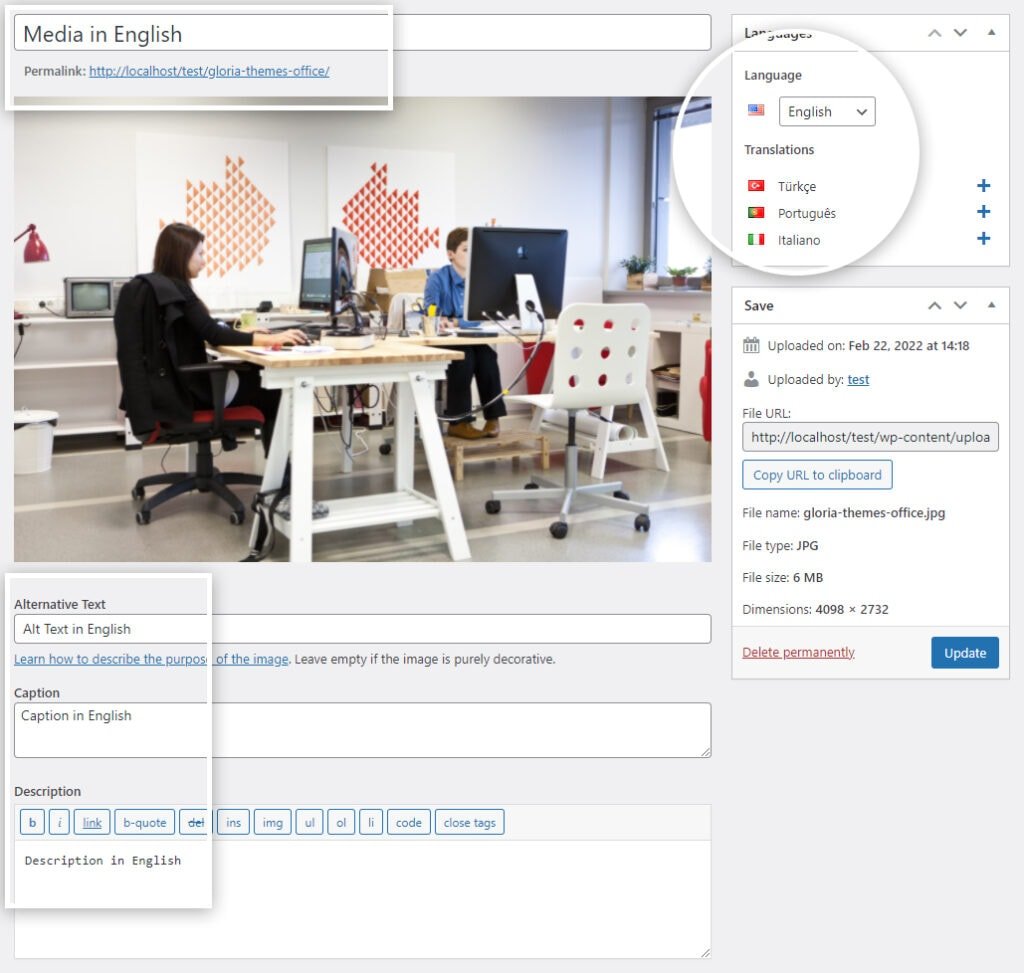
Step 5 – After the process is finished, click on the ‘Update’ button.
If you want to add the media to a French post, Polylang filters the Media library according to the post’s language, so in French. In the screenshot below, only “Media FR” is visible in the media library, while its translation “Media EN” is hidden.
Translating Widgets #
Legacy Widgets #
Step 1 – Navigate to the Appearance > Widgets.
Step 2 – Open the widget you want to translate.
Step 3 – You have the possibility to choose to display them for all languages (default setting) or only one language.
You can create one more of the same widget for each language.
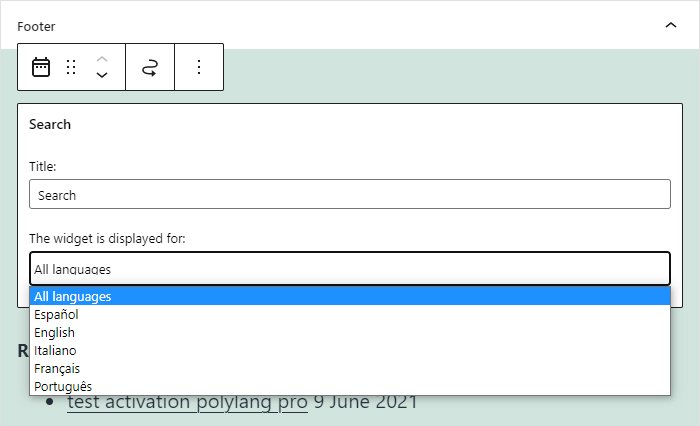
Step 4 – Save the changes after the process is finished.
Block-based Widgets #
Step 1 – Navigate to the Appearance > Widgets.
Step 2 – Open the widget you want to translate.
Step 3 – You have the possibility to choose to display them for all languages (default setting) or only one language.
You need to have Polylang Pro for this feature.
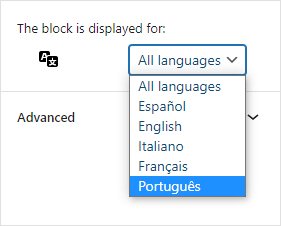
Step 4 – Save the changes after the process is finished.
Language Switcher #
How to Add Language Switcher to the Menu? #
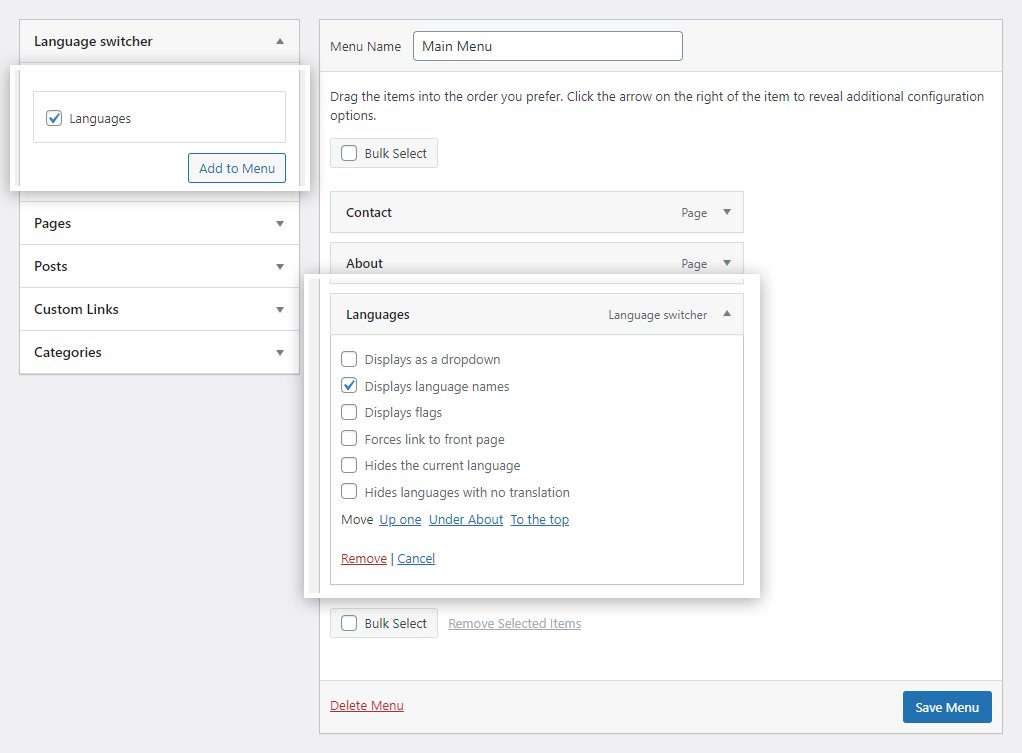
Step 1 – Navigate to the Appearance > Menus.
Step 2 – Open the menu you want to edit.
Step 3 – Click on the ‘Screen Options’ in the top right.
Step 4 – Select the ‘Language Switcher’ in the ‘Screen Options’.
Step 5 – The language selector item will appear in the left menu items. Add the language selector to your menu.
Step 6 – Save the menu. It’s ready!
How to Add Language Switcher to the Widgets? #
Legacy Widgets #
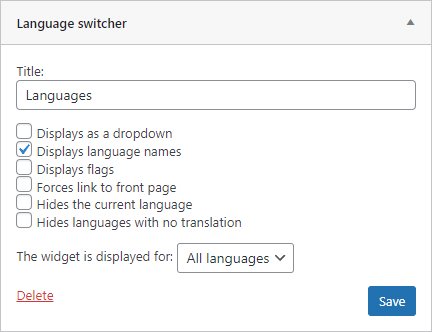
Step 1 – Navigate to the Appearance > Widgets.
Step 2 – Drag and drop the ‘Polylang Language Switcher’ widget to the widget area you want to use.
This option works with Polylang Pro for existing widgets only, it is no longer possible to add it. The block must be used instead.
Block-based Widgets #
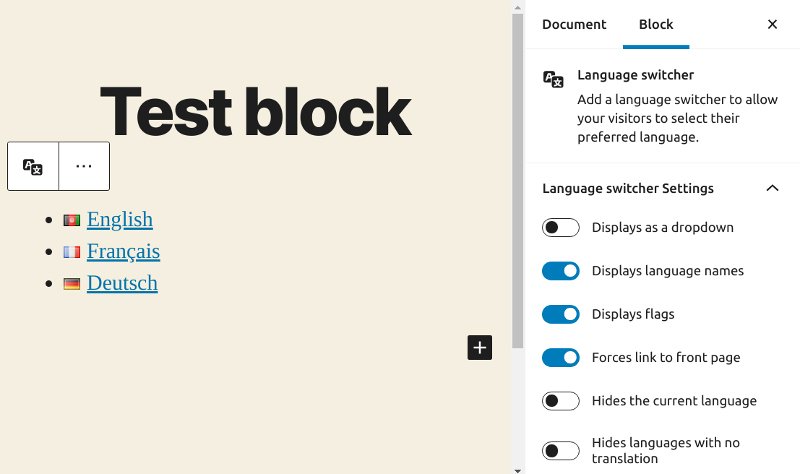
Step 1 – Navigate to the Appearance > Widgets.
Step 2 – Search for “Language Switcher” in the search form of the block editor.
Step 3 – Drag and drop the ‘Language Switcher’ widget to the widget area you want to use.
Polylang FAQ #
How to Add New Languages to Polylang? #
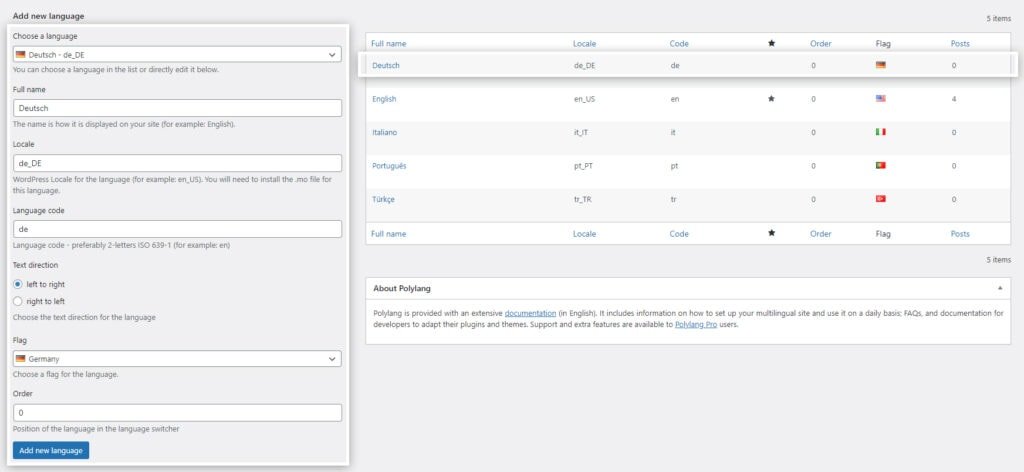
Step 1 – Navigate to the Languages > Languages.
Step 2 – Fill in the details of the language you want to add from the left panel.
- Choose a Language: You can choose a language in the list or directly edit it below.
- Full Name: The name is how it is displayed on your site (for example: English).
- Locale: WordPress Locale for the language (for example: en_US). You will need to install the .mo file for this language.
- Language Code: Language code – preferably 2-letters ISO 639-1 (for example: en).
- Text Direction: Choose the text direction for the language.
- Flag: Choose a flag for the language.
- Order: Position of the language in the language switcher.
Step 3 – Click on the ‘Add New Language’ button. New language will be added.
How to Remove a Language from Polylang? #
Step 1 – Navigate to the Languages > Languages.
Step 2 – Click the ‘Delete’ button on the language you want to delete.
After having deleted the French language, the French post (Post FR) is not removed but no more language is assigned to it. You also loose the link with the translations in other languages. The posts without language are still available and visible on admin side, but they are not shown anymore on frontend side.
Pages, categories, tags, custom post types and custom taxonomies are impacted in the same way. The navigation menus are not deleted either but no more language is assigned. Strings translations are definitively removed. The same for all users biographical information in that language.
Once a language is deleted, you will get a message above the languages list table to warn you that not all content has a language assigned (and thus that not all the content is visible on frontend). The link offers you the possibility to assign the default language to all the content without language.
How to Use Polylang in Post Types and Taxonomies? #
Only available in Polylang Pro.
Step 1 – Navigate to the Languages > Settings.
Step 2 – Locate the ‘Custom Post Types and Taxonomies’ and click on the ‘Settings’ button.
Step 3 – You will see all the post types and taxonomies used on your site. Select the post types or taxonomies you want to use Polylang for.
Step 4 – Click on the ‘Save Changes’ button.

How to Migrate WPML to Polylang? #
That’s pretty easy to do manually but it is quite boring to do if there are tons of posts to migrate (you would have to set all languages and translations manually). There is a small plugin which does automate the conversion. It imports languages, all posts and terms languages as well as translations, strings translations, multilingual nav menus and also WPML options when they have their counterpart in Polylang.
Things to consider before migrating:
- WordPress 4.9 or higher must be installed.
- No language should be created with Polylang prior to migration.
- Polylang 2.8 or higher must be installed
- WPML must be deactivated.
Step 1 – Navigate to the Plugins.
Step 2 – Find the WPML and deactivate it.
If you have WPML extensions or components, deactivate them. You can even delete WPML and WPML extensions/components.
Step 3 – Navigate to the Plugins > Add New.
Step 4 – Search for ‘WPML to Polylang’ from the search form.
Step 5 – Click the ‘Install Now’ button on WPML to Polylang plugin.
Step 6 – Wait for the plugin to installed.
Step 7 – Click the ‘Activate’ button.
Step 8 – Navigate to the Tools > WPML Importer.
Step 9 – If all checks are passed, you can click on the ‘Import’.
If something went wrong and you want to revert to WPML, you can delete Polylang using the red link in Plugins table (it will delete all data created for Polylang) and then re-activate WPML.
How to Enable the Browser’s Preferred Language Detection #
When activated, someone visiting your homepage for the first time is redirected to the homepage in the language according to his browser preferences. If his browser preferences do not include any language of your site, the default language is used.
Step 1 – Navigate to the Languages > Settings.
Step 2 – Locate the ‘Detect Browser Language’ and click on the ‘Activate’ button.
How to Change URL Structure for Polylang? #
Step 1 – Navigate to the Languages > Settings.
Step 2 – Locate the ‘URL Modifications’ and click on the ‘Settings’ button.
Step 3 – There you will see the URL options.
Step 4 – Select the URL structure and and save it.
How to Translate URLS slugs #
Only available in Polylang Pro.
This feature allows you to translate the URL slugs for post formats, custom post types, custom taxonomies, as well as category, tag, author, page, attachment, etc. The example below is for the slug ‘category’ but translating other URL slugs works the same way.
Let’s say that you have created a category in French and its English translation. By default your categories URLs would look like:
/fr/category/voyage
/en/category/travel
As you can see, the slug ‘category’ is identical whatever the language.
Step 1 – Navigate to the Languages > Strings Translations.
Step 2 – You will see a list of all strings on this page.
Step 3 – Search for your URL strings using the filters at the top of the page or locate the URL strings you want to translate.
Once done, your categories URLs look like:
/fr/categorie/voyage
/en/category/travel
How to Find Polylang Documentation? #
Click for Polylang documentation website.