- What is Multilingual Website and WPML?
- How to Buy WPML
- How to Download WPML
- How to Install WPML
- Translating Website Content
- Language Switcher
- WPML FAQ
- How to Add Languages to WPML
- How to Create a Language That Is Not In the Plugin (Custom Language)
- How to Remove a Language from WPML
- How to Enable the Browser’s Language Detection
- How to Change URL Structure for WPML
- How to Sync Menus?
- How to Use WPML in Post Types and Taxonomies
- How to Translate Meta Fields
- How to Migrate Polylang to WPML
- How to Find WPML Documentation
What is Multilingual Website and WPML? #
You can use WordPress in any language that you want. It is super easy to create a website in any single language. However, by default WordPress can support only one language at a time. Companies, government sites, sports clubs, international service organizations and other many websites often need to offer their website in multiple languages.
There are two solutions for this need. One way to offer multiple language options is to install WordPress installation in subdomains or subdolder for each language. This is a lot of hassle, as you will have to manage updates, contents, themes, plugins, and backup all those installations. Therefore, we do not recommend this way.
The other way is a WordPress installation with a multilingual plugin. WPML or Polylang plugins will encounter your need. In this article, we will tell you WPML installation, usage and other details. WPML (The WordPress Multilingual Plugin) is one of the most popular translation plugins on the market. With WPML you can translate pages, posts, custom types, taxonomy, menus and even the theme’s texts.
How to Buy WPML #
WPML is a paid plugin, but it’s by far the most comprehensive option. There is a reason why over 500,000 websites use WPML for creating a multilingual WordPress site.
Step 1 – Go to WPML website.
Step 2 – Navigate to the Purchase page from the site menu.
Step 3 – You can review the prices by packages on this page and make a purchase.
How to Download WPML #
Downloading WPML #
Step 1 – Log in to WPML with your account.
Step 2 – Navigate to the Downloads tab at the top right of the header.. Your all purchases and items appear in this page.
Step 3 – In order to install WPML, you need to download the ‘WPML Multilingual CMS’ plugin for basic installation or ‘OTGS Installer’ for light installation. Download this plugin.
After purchasing WPML, you will have the following plugins. Basically, to use WPML, you just need to install the WPML Multilingual CMS or the OTGS Installer. One of these plugins will get you the WPML plugin. You can check the list below for other plugins and extensions.
WPML Plugins #
These plugins will let you build complete multilingual sites and translate them conveniently. You should install all of them for every multilingual site that you build.
- OTGS Installer: Light installer for downloading WPML and other OnTheGoSystems plugins from within WordPress.
- WPML Multilingual CMS: The core plugin turns WordPress multilingual. It adds the basic translation controls and allows translating content.
- String Translation: The String Translation plugin allows to translate interface strings directly from within WordPress without having to use .mo files. The String Translation plugin allows more than just translating static texts. It also lets you translate user-generated texts that are outside of posts and pages. For example, the tagline and SEO data.
- Translation Management: When your clients receive their newly created multilingual site, your work ends and their work begins. The Translation Management plugin helps site admins manage their translation work. They will turn normal users into translators, send jobs to them and track progress of the site’s translation status.
- Media Translation: This plugin allows using the WordPress Gallery in different languages. You can control which images will display for each language.
WPML Components & Extensions #
You can also use the following plugins when you need them. These plugins add multilingual features to other plugins.
- WooCommerce Multilingual: WooCommerce Multilingual allows running WooCommerce stores with several languages and currencies.
- Gravity Forms Multilingual: WPML lets you translate the texts that appear in your Gravity Forms to other languages on your site. Once translated, the form displays in the correct language on the front-end automatically.
- Contact Form 7 Multilingual: Contact Form 7 allows you to create, customize, and manage front-end forms for your site.
- Ninja Forms Multilingual: Ninja Forms is an intuitive drag-and-drop form builder for WordPress. Learn how to use WPML to create multilingual forms using Ninja Forms.
- WPForms Multilingual: WPForms is a plugin for adding contact forms to your WordPress site. In this guide, you can learn how to make your WPForms multilingual using WPML.
- BuddyPress Multilingual: BuddyPress and BuddyBoss turn your WordPress website into a social network, add forums, groups, and even offer memberships and courses. To translate sites built on these platforms, you’ll need WPML’s BuddyPress Multilingual glue plugin.
- Advanced Custom Fields Multilingual: Learn how to translate sites that are built with the Advanced Custom Fields (ACF) plugin and WPML.
- WP All Import Multilingual: WP All Import plugin allows you to import posts, pages, WooCommerce products, and other custom post types in bulk from CSV files.
- MailChimp Multilingual: The integration between Mailchimp for WordPress (MC4WP) plugin and WPML allows you to translate sign-up forms and related messages.
- WPML SEO: Yoast SEO and WPML power tens of thousands of multilingual WordPress sites.
- Toolset Types: Set up custom post types, custom fields and taxonomy for multilingual sites. Enjoy repeating field groups, post relationship and other power features, in one integrated plugin from the makers of WPML.
- Sticky Links: The Sticky Links plugin keeps internal links from ever breaking. It automatically tracks linked pages in your site and keeps all incoming links up-to-date. When you change permalink structure, hierarchy and even page slugs, all incoming links update immediately.
- CMS Navigation: The CMS Navigation plugin adds navigational elements which you can use when building the site. This includes a breadcrumbs trail, drop-down menus and sidebar navigation.
How to Install WPML #
You can use WPML by installing one of the two plugins below. The result will be the same for both and you will be have a WPML. However, OTG allows you to install WPML and other OnTheGoSystems plugins from within WordPress.
Installation WPML with WPML Multilingual CMS Plugin #
The core plugin turns WordPress multilingual. It adds the basic translation controls and allows translating content.
Step 1 – Login to your WordPress admin panel.
Step 2 – Navigate to the Plugins > Add New.
Step 3 – Click on the ‘Upload Plugin’ button at the top of page.
Step 4 – Click on the ‘Choose File’ button.
Step 5 – Find the plugin file you have just downloaded from WPML. Choose the WPML Multilingual CMS (sitepress-multilingual-cms.zip) file.
Step 6 – Click on the ‘Install Now’ button and wait for the plugin installation to complete.
Step 7 – Click on the ‘Active’ button.
Step 8 – After installing WPML, navigate to WPML from WordPress admin panel.
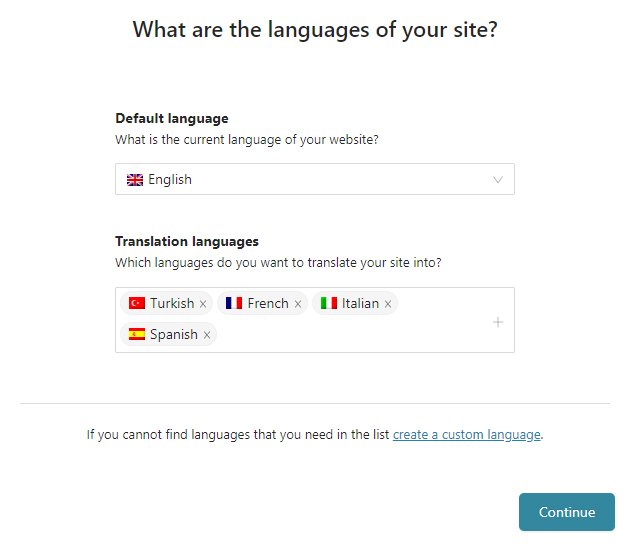
Step 9 – You will see a WPML setup steps in this page. Select your default language from the ‘Default language’ option and the languages you want to add from the ‘Translation languages’ field in first step (Languages). After select, click on the ‘Continue’ button.
If you cannot find languages that you need in the list, you can create a custom language. Click on the ‘Custom Language’ button at the bottom of the page.
Step 10 – Select the URL format you want to use in this step (URL Format) and click on the ‘Continue’ button.
The “Different languages in directories” option is fine, but you can use other options if you want.
Step 11 – In this step (WPML Register) you need to enter your site key. You can generate a site key for your website in your WPML account. After entering the key, click on the ‘Continue’ button.
Site key generation guide is exist on this page.
Step 12 – In this step (Translation), choose how you want to translate this site and click on the ‘Continue’ button.
- Translate Everything: WPML will automatically translate content that you publish or update.
- Translate Some: I want to choose which content to translate.
Step 13 – This step (Support) for WPML support details. You can select the settings you want and proceed to the next step.
Step 14 – In this step (Plugins), you can install WPML extensions if you need them. Click on the ‘Skip’ button or select the plugins you want to install and click on the ‘Install and Active’ button.
Step 15 – Click on the ‘Finish’ button in the last step (Finished). You are ready for translation!
Installation WPML with OTGS Installer Plugin #
Light installer for downloading WPML and other OnTheGoSystems plugins from within WordPress.
Step 1 – Login to your WordPress admin panel.
Step 2 – Navigate to the Plugins > Add New.
Step 3 – Click on the ‘Upload Plugin’ button at the top of page.
Step 4 – Click on the ‘Choose File’ button.
Step 5 – Find the plugin file you have just downloaded from WPML. Choose the OTGS Installer (otgs-installer-plugin.zip) file.
Step 6 – Click on the ‘Install Now’ button and wait for the plugin installation to complete.
Step 7 – Click on the ‘Active’ button.
Step 8 – After installing WPML, navigate to WPML Installer from WordPress admin panel.
Step 9 – Click on the ‘Register WPML’ in the ‘Already purchased WPML?’ field. Enter your site key in the ‘Site Key’. You can generate a site key for your website in your WPML account. After entering the key, click on the ‘Register’ button.
Site key generation guide is exist on this page.
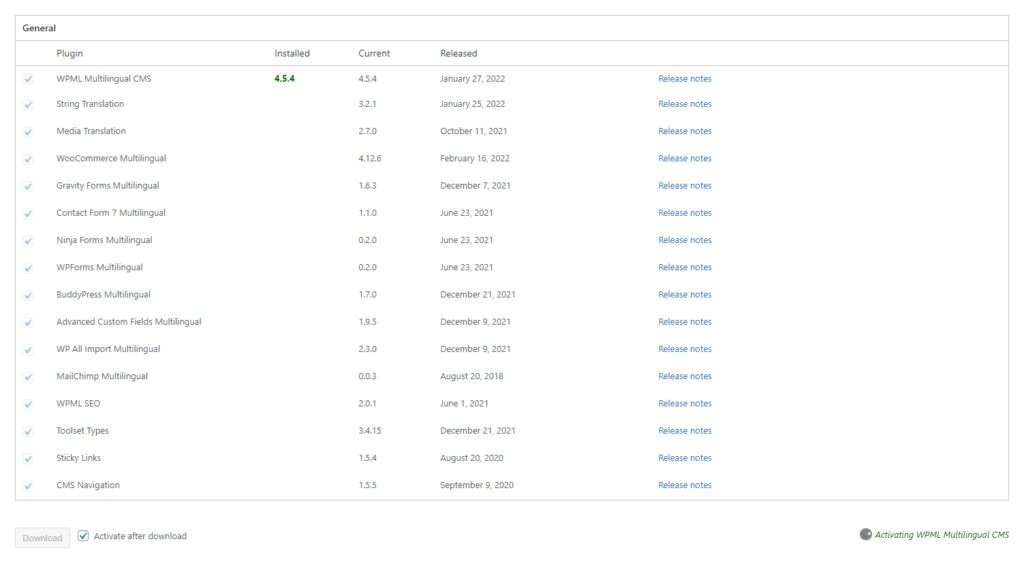
Step 10 – You will have a list of WPML plugins and extensions you have purchased on this page.
Step 11 – Select the plugins you want to install and check the ‘Activate after download’ option. After selecting and checking, click on the ‘Download’ button. After the download/install is complete, you will see a ‘Operation complete!’ notification at the bottom of the list.
Step 12 – Return to the WordPress admin dashboard or refresh the current page.
Step 13 – Navigate to WPML from WordPress admin panel.
Step 14 – You will see a WPML setup steps in this page. Select your default language from the ‘Default language’ option and the languages you want to add from the ‘Translation languages’ field in first step (Languages). After select, click on the ‘Continue’ button.
If you cannot find languages that you need in the list, you can create a custom language. Click on the ‘Custom Language’ button at the bottom of the page.

Step 15 – Select the URL format you want to use in this step (URL Format) and click on the ‘Continue’ button.
The “Different languages in directories” option is fine, but you can use other options if you want.
Step 16 – In this step (WPML Register) you need to enter your site key. You can generate a site key for your website in your WPML account. After entering the key, click on the ‘Continue’ button.
Site key generation guide is exist on this page.
Step 17 – In this step (Translation), choose how you want to translate this site and click on the ‘Continue’ button.
- Translate Everything: WPML will automatically translate content that you publish or update.
- Translate Some: I want to choose which content to translate.
Step 18 – This step (Support) for WPML support details. You can select the settings you want and proceed to the next step.
Step 19 – In this step (Plugins), you can install WPML extensions if you need them. Click on the ‘Skip’ button or select the plugins you want to install and click on the ‘Install and Active’ button.
Step 20 – Click on the ‘Finish’ button in the last step (Finished). You are ready for translation!
Installation WPML Components & Extensions #
You can install other components and extensions (String Translation, Translation Management, Media Translation, WooCommerce Multilingual, WPML SEO, Toolset Types, CMS Navigation etc.) that come with WPML by following the way below. Don’t forget to download any components or extensions you want to install from WPML’s site before installing.
Step 1 – Login to your WordPress admin panel.
Step 2 – Navigate to the Plugins > Add New.
Step 3 – Click on the ‘Upload Plugin’ button at the top of page.
Step 4 – Click on the ‘Choose File’ button.
Step 5 – Find the plugin file you have just downloaded from WPML.
Step 6 – Click on the ‘Install Now’ button and wait for the plugin installation to complete.
Step 7 – Finally, click on the ‘Active’ button.
Translating Website Content #
Translating Pages, Posts, and Custom Post Types #
Step 1 – Login to your WordPress admin panel.
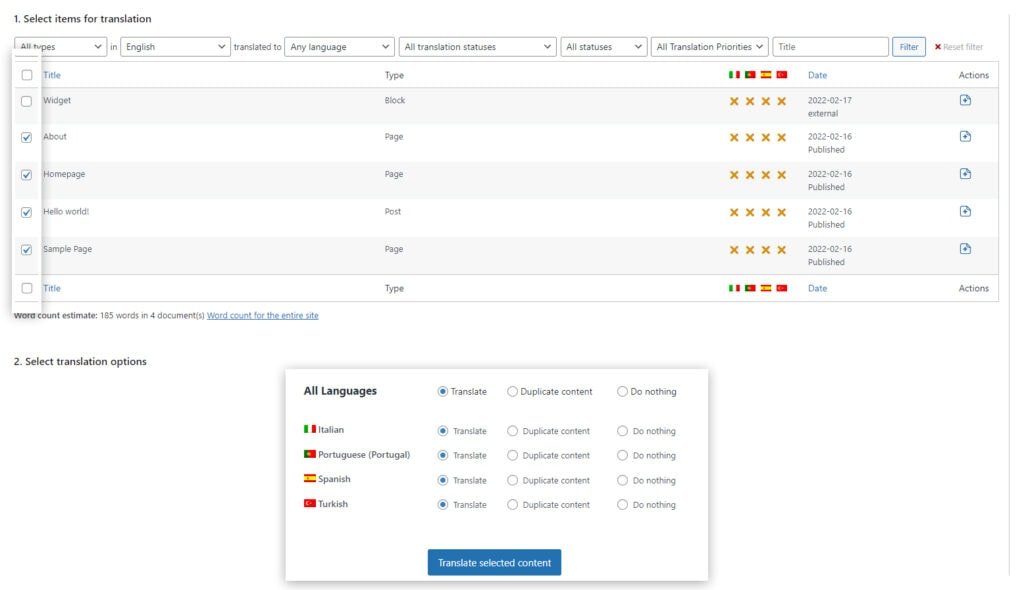
Step 2 – Navigate to the WPML > Translation Management.
Step 3 – Click on the content/page that needs to be translated.
Step 4 – Choose which languages to translate into (or duplicate content).
The duplicated pages create a copy of the main content for each language. You can manually add your translations and edit the pages by duplicating the contents.
If you are the site’s only translator, there is no translation basket. You can instead access any of your translation jobs from WPML > Translations.
Step 5 – Click on the button.
Translating Categories, Tags and Taxonomies #
If there is no term you have created before, first create the term in the main language.
Step 1 – Navigate to the taxonomy you want to edit. (Categories, tags, etc.)
Step 2 – Click on the ‘Edit’ button in the taxonomy you want to edit.
Step 3 – You will see ‘Language’ field. Click the ‘Add’ button of the language you want to add a translation for.
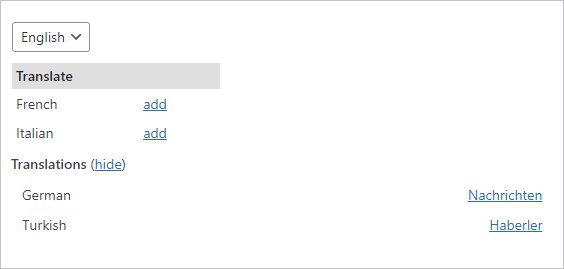
Step 4 – The new taxonomy creation page will open. Fill in the fields. So there will be a term for each language.
Step 5 – After filling, click on the ‘Add New’ button.
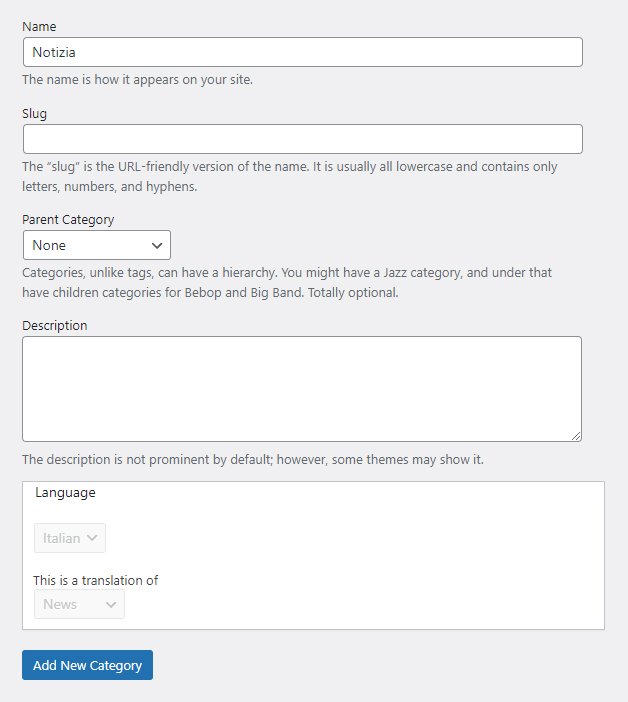
If you do not want to work with this method, you can also translate taxonomies from the WPML page.
Step 1 – Navigate to the WPML > Taxonomy Translation.
Step 2 – Select the taxonomy to translate from the selectbox.
Step 3 – The terms of the taxonomy you selected will be listed.
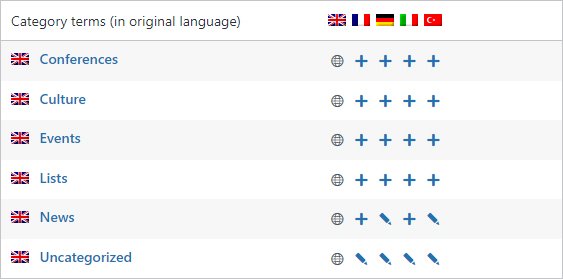
Step 4 – You will see ‘Language’ field. Click the ‘Add’ button of the language you want to add a translation for.
Step 5 – You can translate the title, slug and descriptions from the pop-up window.
Translating Strings #
You will usually translate website content from the Translation Management page. However, sometimes you need to translate texts that do not belong to any specific page. For example, you may need to translate widget titles, customizer/theme option texts, theme texts, or the site’s tagline. For this, you need to install the String Translation plugin before starting the string translation.
Step 1 – Navigate to the WPML > String Translation.
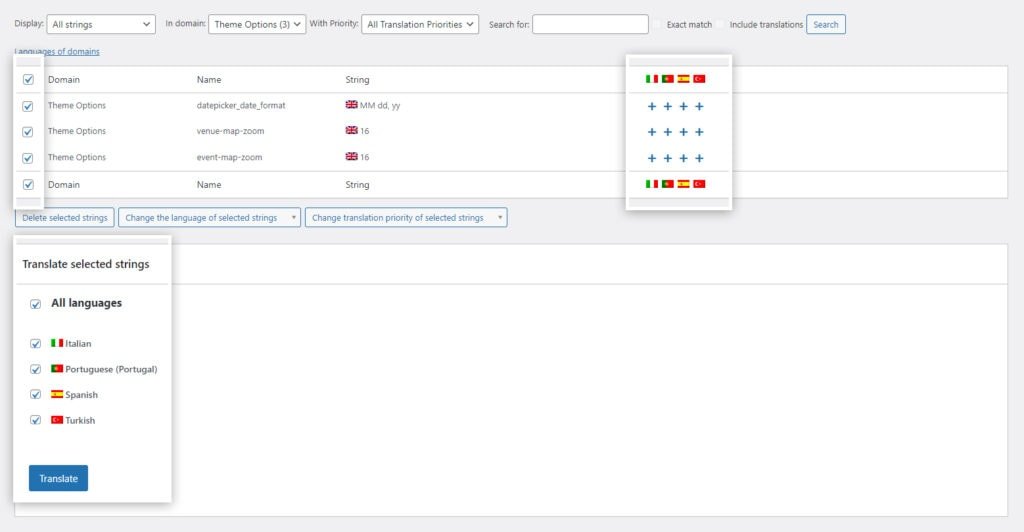
Step 2 – You will see a list of all strings on this page.
Step 3 – Search for your strings using the filters at the top of the page or locate the strings you want to translate.
Step 4 – Check the strings you want to translate.
Step 5 – Translate by clicking the plus button on the strings for manual translation or add them to your translation basket for automatic translation and click on the button.
Translating Media #
Some of your content will include images and other media. For example, you can have pages with screenshots or attached PDF documents. Normally, translated content will include the exact same media as the original content. You can use the WPML Media Translation add-on to set different media for translations. For this, you need to install the Translating Media plugin before starting the string translation.
Step 1 – Navigate to the WPML > Media Translation.
Step 2 – You will see a list of all media on this page.
Step 3 – Click to edit any image and upload its replacement.
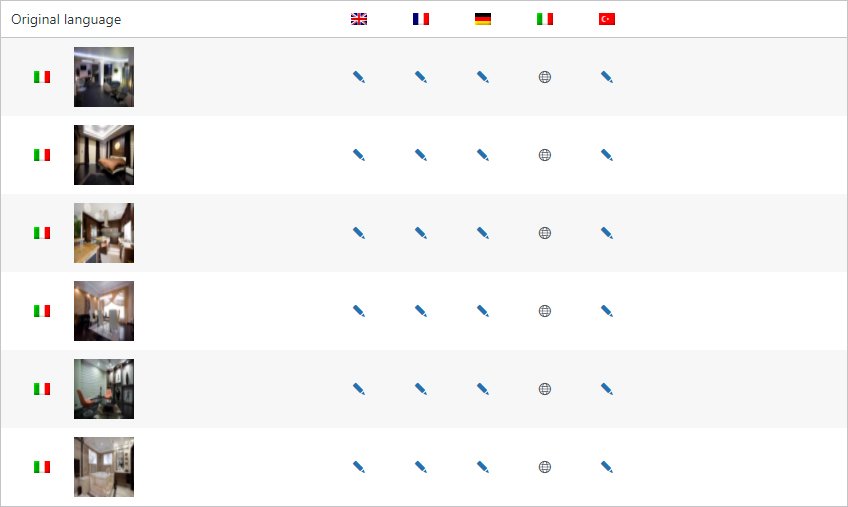
Step 4 – After the process is complete, save the page.
WordPress makes a copy of the image captions and title texts when you insert images into content. You can translate these texts when you translate the rest of your page in the Advanced Translation Editor plugin.
Translating Content Created with Page Builders #
WPML allows you to easily translate pages you build using Elementor or WPBakery Page Builder. WPML also supports many other page builders, you can check the page builder list on WPML website.
Step 1 – Duplicate your pages as described in the Translating Pages, Posts, and Custom Post Types section.
If you are using automatic translation, you do not need to do these anyway.
Step 2 – Navigate to the post type you want to edit (Pages, posts etc.)
Step 3 – Click the plus/edit icon for the language you want to translate the post into.
Step 4 – WPML’s Advanced Translation Editor opens, and you can add your translations for each sentence in the field on the right. Click the green check mark to complete each translation. You can also use automatic translation to translate the entire page in one click. Double check each translation to make sure they are correct.
Step 5 – When you are done translating, click Finish and then Close.
Language Switcher #
How to Add Language Switcher to the Menu #
Step 1 – Navigate to the WPML > Languages.
Step 2 – Click on the ‘+ Add a new language switcher to a menu’ button from the ‘Menu language switcher’ field.
Step 3 – Create a language switcher and design it.
Step 4 – Finally, select the menu where you want to add the language switcher and click on the ‘Save’ button.
How to Add Language Switcher to the Widgets #
Step 1 – Navigate to the WPML > Languages.
Step 2 – Locate the ‘Widget Language Switcher’ field.
Step 3 – Click on the ‘Add a new language switcher to a widget area’ button.
Step 4 – Select a widget area where you want to add the language switcher from the ‘Widget Area’ field.
Step 5 – Select a style from the ‘Language Switcher Style’ field. Also you can use other customization fields.
Step 6 – Click on the ‘Save’ button.
How to Add Language Switcher to the Footer #
Step 1 – Navigate to the WPML > Languages.
Step 2 – Locate the ‘Footer Language Switcher’ field.
Step 3 – Check the ‘Show language switcher in footer’.
If you need to customize the language switcher for the footer, click the edit button.
How to Customize the Language Switchers #
Step 1 – Navigate to the WPML > Languages.
Step 2 – Locate the ‘Custom Language Switchers’ field.
Step 3 – Check the ‘Enable’ input.
Step 4 – Click on the ‘Customize’ button.
Step 5 – Design the language switcher and click on the ‘Save’ button.
How to Order the Language Switcher Languages #
Step 1 – Navigate to the WPML > Languages.
Step 2 – Locate the ‘Language Switcher Options’ field.
Step 3 – Drag and drop the languages to change their order.
All language switchers in your site are affected by the settings in this section.
WPML FAQ #
How to Add Languages to WPML #
Step 1 – Navigate to the WPML > Languages.
Step 2 – You will see the ‘Site Languages’ field. Click on the ‘Add / Remove Languages’ button.
Step 3 – A list of all available languages will open. Simply select the languages you want to add and click on the ‘Save’ button.
How to Create a Language That Is Not In the Plugin (Custom Language) #
Step 1 – Navigate to the WPML > Languages.
Step 2 – Click the ‘Edit Languages’ link.
Step 3 – A new page will open and there will be a list of all available languages. Click on the ‘Add Language’ button at bottom of the page.
Step 4 – A new line will be added to the list. Enter the details of the language (Language name, code, flag, main code, etc.) you want to add and your new language will be added.
How to Remove a Language from WPML #
Step 1 – Navigate to the WPML > Languages.
Step 2 – Locate the ‘Site Languages’ field.
Step 3 – Click on the ‘Add / Remove languages’ button.
Step 4 – A list of all available languages will open. Deselect the language you want to remove.
Step 5 – Click on the ‘Save’ button.
How to Enable the Browser’s Language Detection #
Step 1 – Navigate to the WPML > Languages.
Step 2 – Locate the ‘Browser Language Redirect’ field.
Step 3 – Choose the ‘Redirect visitors based on browser language only if translations exist’ or ‘Always redirect visitors based on browser language (redirect to home page if translations are missing)’.
Step 4 – Click on the ‘Save’ button.
How to Change URL Structure for WPML #
Step 1 – Navigate to the WPML > Languages.
Step 2 – Locate the ‘Language URL Format’ field.
Step 3 – There you will see the URL options.
Step 4 – Select the URL structure and and save it.
How to Sync Menus? #
Menu synchronization will sync the menu structure from the default language of English to the secondary languages.
Step 1 – Navigate to the WPML > WP Menus Sync.
Step 2 – Click the ‘Sync’ button at the bottom of the page.
Step 3 – Select the menus you want sync.
Step 4 – Click on the ‘Apply Changes’ button and wait for the process to complete.
How to Use WPML in Post Types and Taxonomies #
Step 1 – Navigate to the WPML > Settings.
Step 2 – Locate the ‘Post Types Translation’ field.
Step 3 – You can choose translatable or untranslatable status for post types or taxonomies.
Step 4 – Click on the ‘Save’ button.
How to Translate Meta Fields #
Step 1 – Navigate to the WPML > Settings.
Step 2 – Locate the ‘Custom Fields Translation’ field.
Step 3 – You can choose translate, don’t translate, copy or copy once status for meta fields.
Step 4 – Click on the ‘Save’ button.
How to Migrate Polylang to WPML #
Back up your database before starting the migration.
Step 1 – Navigate to the Plugins.
Step 2 – Find the Polyland and deactivate it.
Step 3 – Go to Migrate Polylang to WPML on GitHub and get the latest release (on top of the list).
Step 4 – In the Code section choose the Download ZIP and the plugin will be downloaded to your computer.
Step 5 – Login to your WordPress admin panel.
Step 6 – Navigate to the Plugins > Add New.
Step 7 – Click on the ‘Upload Plugin’ button at the top of page.
Step 8 – Click on the ‘Choose File’ button.
Step 9 – Find the plugin file you have just downloaded from GitHub. Choose the ZIP file (migrate-polylang-to-wpml.zip) file.
Step 10 – Click on the ‘Install Now’ button and wait for the plugin installation to complete.
Step 11 – Click on the ‘Active’ button.
Step 12 – Navigate to the Plugins.
Step 13 – If the plugin is disabled, activate the WPML Multilingual CMS plugin. If you also want to migrate string translations, activate WPML String Translation plugin.
Step 14 – If you have custom post types, navigate to the WPML > Settings and scroll to locate the Post Types Translation field. Set those types to be translatable.
Step 15 – Navigate to the Tools > Migrate from Polylang to the WPML.
Step 16 – Click on the ‘Migrate’ button and wait until the migration process is completed.
After the process is complete, you can uninstall the Migrate Polylang to WPML plugin.
How to Find WPML Documentation #
You can find all articles and documents about WPML on this page.